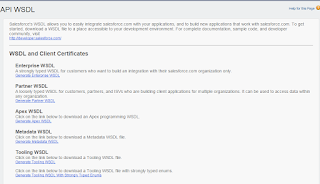
Step 1:Download enterprise wsdl from salesforce.com and save it as xml file
for eg:enterprisewsdl.xml
Go to setup --> API --> "Generate Enterwise WSDL".

Step 2: Download any wsc file from below link
https://code.google.com/p/sfdc-wsc/downloads/list
I downloaded wsc-19.jar.
Step 3:Place wsdl file and wsc file all in one folder.
Step 4:Open command prompt and move to that specified folder path and run the following command.
Assume "c:\Action Items\JavaIntegration" is the path of folder .
c:\Action Items\JavaIntegration>java -classpath wsc-19.jar com.sforce.ws.tools.wsdlc enterprisewsdl.xml enterprise.jar
In the above command, enterprisewsdl is the path of wsdl which we have downloaded earlier.
It will generate one enterprise.jar file as shown in the image below.
Step 5:write one java class as shown below.Add the jar files "wsc-19.jar" and generated "enterprise.jar" to that class.
import java.io.BufferedReader;
import java.io.FileNotFoundException;
import java.io.IOException;
import java.io.InputStreamReader;
import com.sforce.soap.enterprise.EnterpriseConnection;
import com.sforce.soap.enterprise.GetUserInfoResult;
import com.sforce.soap.enterprise.sobject.Account;
import com.sforce.ws.ConnectionException;
import com.sforce.ws.ConnectorConfig;
public class AccountInsertion {
public String authEndPoint = "";
EnterpriseConnection con;
private static BufferedReader reader = new BufferedReader(new InputStreamReader(System.in));
public static void main(String[] args) {
AccountInsertion sample = new AccountInsertion("https://login.salesforce.com/services/Soap/c/29");
if ( sample.login()) {
sample.insertAcct();
}
}
public AccountInsertion(String authEndPoint) {
this.authEndPoint = authEndPoint;
}
public String getUserInput(String prompt) {
String result = "";
try {
System.out.print(prompt);
result = reader.readLine();
}
catch (IOException ioe) {
ioe.printStackTrace();
}
return result;
}
public boolean login() {
boolean success = false;
String userId = getUserInput("UserID: ");
String passwd = getUserInput("Password + Security Token: ");
try {
/* Setting up Username and Password */
ConnectorConfig config = new ConnectorConfig();
config.setAuthEndpoint(authEndPoint);
config.setUsername(userId);
config.setPassword(passwd);
config.setCompression(true);
System.out.println("AuthEndPoint: " + authEndPoint);
config.setTraceFile("insertLogs.txt");
config.setTraceMessage(true);
config.setPrettyPrintXml(true);
System.out.println("\nLogging in ...\n");
con = new EnterpriseConnection(config);
GetUserInfoResult userInfo = con.getUserInfo();
System.out.println("UserID: " + userInfo.getUserId());
System.out.println("\nLogged in Successfully\n");
success = true;
}
catch (ConnectionException ce) {
ce.printStackTrace();
}
catch (FileNotFoundException fnfe) {
fnfe.printStackTrace();
}
return success;
}
public void insertAcct() {
/* Getting Account details */
String acctName = getUserInput("Enter Account name:");
String phoneNo = getUserInput("Enter phone no:");
Account acct = new Account();
/* Setting Account details */
acct.setName(acctName);
acct.setPhone(phoneNo);
Account[] accts = { acct };
try {
System.out.println("\nInserting...\n");
/* Inserting account records */
con.create(accts);
}
catch (ConnectionException ce) {
ce.printStackTrace();
}
System.out.println("\nAccount has been inserted successfully.");
}
}
Step 6:Run the java class.
Input:
UserID: username
Password + Security Token: passwordsecuritytoken
AuthEndPoint: https://login.salesforce.com/services/Soap/c/29
Logging in ...
UserID: 00528000000St5nAAC
Logged in Successfully
Enter Account name:Test Java Account
Enter phone no:9999999899
Inserting...
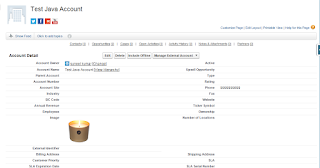
Account has been inserted successfully.
Output :
for eg:enterprisewsdl.xml
Go to setup --> API --> "Generate Enterwise WSDL".

On clicking "Generate" Button you will find wsdl file like this.
Step 2: Download any wsc file from below link
https://code.google.com/p/sfdc-wsc/downloads/list
I downloaded wsc-19.jar.
Step 3:Place wsdl file and wsc file all in one folder.
Step 4:Open command prompt and move to that specified folder path and run the following command.
Assume "c:\Action Items\JavaIntegration" is the path of folder .
c:\Action Items\JavaIntegration>java -classpath wsc-19.jar com.sforce.ws.tools.wsdlc enterprisewsdl.xml enterprise.jar
In the above command, enterprisewsdl is the path of wsdl which we have downloaded earlier.
It will generate one enterprise.jar file as shown in the image below.
Step 5:write one java class as shown below.Add the jar files "wsc-19.jar" and generated "enterprise.jar" to that class.
import java.io.BufferedReader;
import java.io.FileNotFoundException;
import java.io.IOException;
import java.io.InputStreamReader;
import com.sforce.soap.enterprise.EnterpriseConnection;
import com.sforce.soap.enterprise.GetUserInfoResult;
import com.sforce.soap.enterprise.sobject.Account;
import com.sforce.ws.ConnectionException;
import com.sforce.ws.ConnectorConfig;
public class AccountInsertion {
public String authEndPoint = "";
EnterpriseConnection con;
private static BufferedReader reader = new BufferedReader(new InputStreamReader(System.in));
public static void main(String[] args) {
AccountInsertion sample = new AccountInsertion("https://login.salesforce.com/services/Soap/c/29");
if ( sample.login()) {
sample.insertAcct();
}
}
public AccountInsertion(String authEndPoint) {
this.authEndPoint = authEndPoint;
}
public String getUserInput(String prompt) {
String result = "";
try {
System.out.print(prompt);
result = reader.readLine();
}
catch (IOException ioe) {
ioe.printStackTrace();
}
return result;
}
public boolean login() {
boolean success = false;
String userId = getUserInput("UserID: ");
String passwd = getUserInput("Password + Security Token: ");
try {
/* Setting up Username and Password */
ConnectorConfig config = new ConnectorConfig();
config.setAuthEndpoint(authEndPoint);
config.setUsername(userId);
config.setPassword(passwd);
config.setCompression(true);
System.out.println("AuthEndPoint: " + authEndPoint);
config.setTraceFile("insertLogs.txt");
config.setTraceMessage(true);
config.setPrettyPrintXml(true);
System.out.println("\nLogging in ...\n");
con = new EnterpriseConnection(config);
GetUserInfoResult userInfo = con.getUserInfo();
System.out.println("UserID: " + userInfo.getUserId());
System.out.println("\nLogged in Successfully\n");
success = true;
}
catch (ConnectionException ce) {
ce.printStackTrace();
}
catch (FileNotFoundException fnfe) {
fnfe.printStackTrace();
}
return success;
}
public void insertAcct() {
/* Getting Account details */
String acctName = getUserInput("Enter Account name:");
String phoneNo = getUserInput("Enter phone no:");
Account acct = new Account();
/* Setting Account details */
acct.setName(acctName);
acct.setPhone(phoneNo);
Account[] accts = { acct };
try {
System.out.println("\nInserting...\n");
/* Inserting account records */
con.create(accts);
}
catch (ConnectionException ce) {
ce.printStackTrace();
}
System.out.println("\nAccount has been inserted successfully.");
}
}
Step 6:Run the java class.
Input:
UserID: username
Password + Security Token: passwordsecuritytoken
AuthEndPoint: https://login.salesforce.com/services/Soap/c/29
Logging in ...
UserID: 00528000000St5nAAC
Logged in Successfully
Enter Account name:Test Java Account
Enter phone no:9999999899
Inserting...
Account has been inserted successfully.
Output :


No comments:
Post a Comment