Search This Blog

Tuesday, May 30, 2017

How to add Email Template for migration in Ant or package.xml

How to add Email Template for migration in Ant or package.xml

Solution: If the emailtemplate is stored in a specific folder,then foldername/Template Unique Name.

If the email template is stored in default Unfiled Public Email Templates folder,then unfiled$public/Template Unique Name
where Template Unique Name is Api name of the template.

Wednesday, May 24, 2017

Error: Compile Error: unexpected syntax: 'extraneous input 'City' expecting SEMICOLON'

Solution:This type of errors occur when we provide spaces in between api names of fields.
trigger ContactAddresUpdate on Contact (before insert,before update) {
    if(trigger.isBefore && (trigger.isInsert || trigger.isUpdate)){
        for(Contact objC : trigger.new){
            if(objC.MailingCity != '') {
                objC.ksk__Languages__c = objC.Mailing City;
            }
        }
    }
}
For example in above code,in this line objC.ksk__Languages__c = objC.Mailing City;
Mailing city is one field and its api name is MailingCity.
So we need to modify that line to objC.ksk__Languages__c = objC.MailingCity; to resolve the issue.

Thursday, May 18, 2017

com.sforce.ws.ConnectionException: Unexpected element. Parser was expecting element Error

Solution: This type of error occurs because of mismatch of versions in authEndpoint and wsdl file version.
I used authEndpoint as : https://login.salesforce.com/services/Soap/c/29
I generated enterprisewsdl file which has top lines like this
<?xml version="1.0" encoding="UTF-8"?>
<!-- Salesforce.com Enterprise Web Services API Version 39.0 Generated on 2017-05-18 08:15:29 +0000. 

Note : wsdl file has version 39.0

So When I changed authEndpoint to https://login.salesforce.com/services/Soap/c/39 in my java code,the above issue is resolved.

Tuesday, May 16, 2017

action:function in Salesforce

action:function in Salesforce

Apex Class:
public class IncrementCounter {
    public Integer counter {get;set;}
    public IncrementCounter() {
        counter = 0;
    }
    public void incrementCounterValue() {
        counter = counter + 1;
    }
}
Visualforce Page:
<apex:page controller="IncrementCounter" >
    <script>
        function callActionFunction() {
            CallingApexMethod();
        }
    </script>
    <apex:form >
        <apex:actionFunction name="CallingApexMethod" action="{!incrementCounterValue}" rerender="panel1">
        </apex:actionFunction>
        <apex:outputPanel id="panel1">
            <apex:outputText value="Incrementing Counter : {!Counter}"  id="x" /><br/>
        </apex:outputPanel>
        <apex:commandButton value="Increment" onclick="callActionFunction()" reRender="false"/>
    </apex:form>
</apex:page>
Output:


How to know which Salesforce Release we are using in our Salesforce Instance

How to know which Salesforce Release we are using in our Salesforce Instance

Solution: Login to Salesforce Instance --> Go to Home Tab --> If you look at top right side of window, you can see "Spring'17 for Developers label as shown in the image below which means we are using/in Spring'17 release.

How to know which Salesforce Edition we are using in our Salesforce Instance

Solution: Login to Salesforce Instance --> Go to Home Tab --> If you hover on Browser tab,it will display which Edition you are using as shown in the image below
Salesforce - Developer Edition means we are using Developer Edition.

Tuesday, May 9, 2017

Enable/Disable Setup Menu feature in Salesforce

Setup Menu helps us to navigate to different components to setup  different options.
The Setup Menu will be as shown in the images below.


We can enable/disable "Setup Menu" from the  user associated profile record.
Go to Setup --> Manage Users --> Profiles --> Edit particular user associated profile .
Here in profile record,"View Setup and Configuration" checkbox is used to enable/disable this feature.

Sample Output: When Setup Menu feature is enabled

When Setup Menu feature is disabled.

Enable/Disable Force.com Advanced Quick Access Menu feature in Salesforce

Force.com Advanced Quick Access Menu helps us to navigate to fields or object or validation rules or Edit Layout easily from Record detail Page
The Quick Access Menu will be as shown in the image below.

We can enable/disable this Quick Access Menu in the user record.
Go to Setup --> Manage Users --> Edit particular user.
Here in user record,Force.com Quick Access Menu checkbox is used to enable/disable this feature.

Sample Output: When Quick Access Menu feature is enabled

When Quick Access Menu feature is disabled.

Monday, May 8, 2017

How to check an object is a custom setting or not in Salesforce?

By using isCustomSetting() of DescribeSObjectResult class,We can check whether the object is a custom setting or not.
If method returns true,its custom setting else it's not a custom setting.
Examples:
Sample Code:
Schema.DescribeSObjectResult d = Account.sObjectType.getDescribe();
system.debug('IS custom Setting : '+ d.isCustomSetting());
Output : 

I created custom Setting Endpoint__c as shown in image below

Sample Code :
Schema.DescribeSObjectResult d = Account.sObjectType.getDescribe();
system.debug('IS custom Setting : '+ d.isCustomSetting());
Output:


Can we view converted lead in Salesforce?

Yes.We can view converted lead information indirectly using report.
Once lead is converted,it will be as shown in the image below.

If we create Lead report,with converted equals true,then in that report,we can view converted lead information as shown in the image below.

Friday, May 5, 2017

How to remove/hide developer Console tool for a user in Salesforce.

Solution: If we disable "View All Data" or "Author Apex" permission from user associated profile,then the user won't be able to access developer console.

While "View All Data" permission enabled.
After "View All Data" permission disabled

Wednesday, May 3, 2017

Error: Unknown component apex:slds while Saving visualforce Page

Problem: While saving below code in visual force page,we are getting the above error.

Sample visual force page code.
<apex:page showHeader="false" standardStylesheets="false" sidebar="false" applyHtmlTag="false" applyBodyTag="false" docType="html-5.0">
<html xmlns="http://www.w3.org/2000/svg" xmlns:xlink="http://www.w3.org/1999/xlink" lang="en">
<head>
  <meta charset="utf-8" />
  <meta http-equiv="x-ua-compatible" content="ie=edge" />
  <title>Salesforce Lightning Design System Trailhead Module</title>
  <meta name="viewport" content="width=device-width, initial-scale=1" />

  <!-- Import the Design System style sheet -->
  <apex:slds />
</head>
<body>

  <!-- REQUIRED SLDS WRAPPER -->
  <div class="slds-scope">

    <!-- MASTHEAD -->
    <p class="slds-text-heading--label slds-m-bottom--small">
      Salesforce Lightning Design System Trailhead Module
    </p>
    <!-- / MASTHEAD -->

    <!-- PRIMARY CONTENT WRAPPER -->
    <div class="myapp">

      <!-- SECTION - BADGE COMPONENTS -->
      <section aria-labelledby="badges">
        <h2 id="badges" class="slds-text-heading--large slds-m-vertical--large">Badges</h2>
        <div>
          <span class="slds-badge">Badge</span>
          <span class="slds-badge slds-theme--inverse">Badge</span>
        </div>
      </section>
      <!-- / SECTION - BADGE COMPONENTS -->

    </div>
    <!-- / PRIMARY CONTENT WRAPPER -->

  </div>
  <!-- / REQUIRED SLDS WRAPPER -->
</body>
</html>
</apex:page>
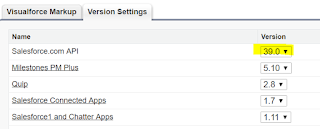
Solution: apex:slds component is available only  from API Version 39.0 .
Go to version Settings in your page and then change Salesforce.com API to 39.0 as shown in the image below.


Tuesday, May 2, 2017

Simple Visualforce Page displaying Account records using AnjularJs

Apex Class:
global  class AccountDisplayController {
    public class AccountDetails {
        public List<AccountWrapper> lstAccount;  
    }
    public class AccountWrapper {
        public String name;
        public String type;
        public String accountSource;
    }
    @RemoteAction
    public static AccountDetails getAccountTableData() {
        AccountDetails objAccountDetails = new AccountDetails();
        List<AccountWrapper> lstAccount = new List<AccountWrapper>();
        for(Account objAccount :[select id,name,type,accountSource from Account limit 3]) {
            AccountWrapper objAccountWrapper = new AccountWrapper();
            objAccountWrapper.name = objAccount.name;
            objAccountWrapper.type = objAccount.type;
            objAccountWrapper.accountSource = objAccount.accountSource;
            lstAccount.add(objAccountWrapper);
            system.debug('sssssss'+objAccount.id);
        }
        objAccountDetails.lstAccount = lstAccount;
        return objAccountDetails ;
    }
}
Visualforce Page:
<apex:page controller="AccountDisplayController">
<script src="https://ajax.googleapis.com/ajax/libs/angularjs/1.4.8/angular.min.js"></script>
<script>
var app = angular.module('myApp', []);
function getData($q) {
    var getAccountDetails = function() {
        var deferred = $q.defer();
        AccountDisplayController.getAccountTableData(function(result, event) {
            if (event.status) {
                deferred.resolve(result);
            } else {
                deferred.reject(
                    'Error Processing the Request :  ' +
                    event.message);
            }
        }, {
            escape: false
        });
        return deferred.promise;
    }
    return {          
        getAccountDetails : getAccountDetails
    };  
}
app.factory('getData',getData);
app.controller('loadAccountData',function($scope,getData) {
    $scope.loadAccountTableData = function () {

               var promise = getData.getAccountDetails();
             
                promise.then(function(obj) {
                                    $scope.accountData = obj;
                                 
                                 
                                }, function(reason) {
                                    alert('Failed: ' + reason);
                                }, function(update) {
                                    alert('Got notification: ' + update);
                                });
    }
    $scope.loadAccountTableData();
});
</script>
<body ng-app="myApp" ng-controller="loadAccountData">
<div>
<table border="1" cellpadding ="0" cellspacing ="0">
    <thead>
        <tr class="header-tr grey-header-tr">
            <th>Account Name</th>
            <th>Account Type </th>
            <th>Account Source </th>
        </tr>
    </thead>
    <tbody>
        <tr ng-repeat="a in accountData.lstAccount track by $index">
            <td>{{a.name}}</td>
            <td>{{a.type}}</td>
            <td>{{a.accountSource}}</td>

       </tr>
    </tbody>
</table>
</div>
</body>
</apex:page>
Output:

Note: If your salesforce org has namespace enabled,use namespace as well while calling controller method.
Like this
//Assuming ABC is the namespace
ABC.AccountDisplayController.getAccountTableData(function(result, event) {
if (event.status) {
deferred.resolve(result);
} else {
deferred.reject(
'Error Processing the Request :  ' +
event.message);
}
}, {
escape: false
});
return deferred.promise;