Play Games

Search This Blog

Wednesday, September 27, 2017

How to override tab with custom visualforce page in salesforce

In this example,We will override Account Tab with custom Visualforce Page.
Steps:
Step 1: Go to Setup --> customize --> Accounts --> Buttons,links and Actions.

Step 2: In the Buttons,links and Actions Section,click on Edit link of the tab as shown in the image below.
Step 3: Click on visualforce page radio button and select the necessary visualforce page as shown in the image below
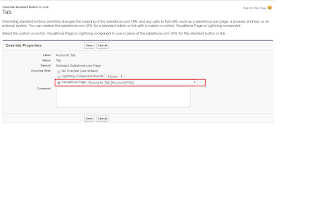
Step 4: Click on save button to save the data as show in the image below.
Thats it.Go to Accounts Tab,now you can see your visualforce page gets opened.

Data Loader Command-Line Interface In Salesforce

Thank you Shiva Chitta for sharing this information.

INTRODUCTION:
Data Loader is tool provided by Salesforce for bulk import or export of data. Sometimes, we come across many scenarios where we want to automate the operations or we perform the same task repeatedly.
In this case, we can use Salesforce Data Loader Command Line Interface (CLI).
CLI runs Data Loader from the command line but it is challenging and difficult to set up. So there CLI quickstart (CLIq) comes into help. It will generate all required files for Command line data loader.
  Installation Steps:
·                 Install Data Loader version 17.0 or later.
·                To download Data Loader, login to Salesforce and go to
       Set Up -> Data Management -> Data Loader -> Download Data Loader
·                Download the latest version of CLIq
·                Unzip cliq.zip and copy & paste the ‘cliq’ folder into your Data Loader home directory
      Typically, this is: C:\Program Files\salesforce.com\Data Loader\cliq
 Configuration Steps:

Go to C:\Program Files\salesforce.com\Data Loader\cliq and open cliq.properties file for proxy settings.

Note: By default, cliq will set for Production. To use it for the sandbox, uncomment line 23 (remove # and save it).
Let’s Get Started – (Part 1 – Data Export)
To run CLIq, run cliq.bat on Windows (cliq.sh on UNIX).
1. Choose an Operation
2. Enter the process name (string). Example: Export_ Accounts
3. Click on Next and enter your org credentials (username, password + security token)
4. Enter Query (Export) or Entity (Object API Name).
5. Review results and create Data Loader CLI Files.
Note: When trying to run process.bat for Salesforce Data Loader from the command line, I encountered an error, "The system cannot find the path specified".
Follow the below steps to resolve the error:

1) Create a folder dataloader (no spaces) in C:\ drive (C:\dataloader)
2) Copy dataloader.jar ,JAVA folder and cliq folder from C:\Program Files\salesforce.com\Data Loader to C:\dataloader
3) Run cliq.bat from cliq folder

A directory will be created with name same as Process name.
·         C:\dataloader\cliq_process\Export_Accounts

As we selected Export Operation, it will automatically create a Export_Accounts.csv file with all data in C:\dataloader\cliq_process\Export_Accounts\write.


Tuesday, September 26, 2017

System.EmailException: SendEmail failed. First exception on row 0; first error: INSUFFICIENT_ACCESS_OR_READONLY, Not profiled to access this Org-wide Email Address:

Problem: Whenever you are referring the organization wide default address while sending emails through sendEmail methods,sometimes you may encounter this error.

Solution: Go to Organization Wide Email Addresses and give necessary profile level access.
Go to Setup --> Email Adminstration --> Organization-wide addresses --> click on 'edit' button of that Email and give profile level access.

How to send email through a custom button on record detail page salesforce

In this example, We are considering sending Email through lead record detail page.

Note: 1) Subject__C custom field is created in  lead object to store the subject of Email.

2) Standard Email field is used to store email address to which email will be sent.
Standard Description field is used to store content/body of Email.

3) Email and Description are mandatory fields in order to send an Email.

Step 1: Create an Apex Class:
public class SendEmailFromLeadController {
    public String emailSent {get;set;}
    public SendEmailFromLeadController(ApexPages.StandardController controller) {
   
    }

    public PageReference sendEmail() {
        emailSent ='';
        List<lead> lstLead = [ select Name,id,description,subject__c,Email FROM lead  WHERE id = :ApexPages.currentPage().getParameters().get('id')];
        emailSent = ApexPages.currentPage().getParameters().get('emailSent');
        PageReference pageRef ;
        if(emailSent == null || emailSent =='') {
            list<Messaging.SingleEmailMessage> lstEmail = new list<Messaging.SingleEmailMessage>();
            Messaging.SingleEmailMessage mail = new Messaging.SingleEmailMessage();
            mail.setTargetObjectId(lstLead[0].Id);
            mail.setToAddresses(new List<String>{lstLead[0].Email});
            mail.SetSubject(lstLead[0].subject__c);
            mail.setPlainTextBody(lstLead[0].description);
            lstEmail.add(mail);
            list<Messaging.SendEmailResult> lstResults = Messaging.sendEmail(lstEmail);
            if(lstResults[0].isSuccess()) {
                emailSent = 'Email Successfully Sent';
                pageRef = New PageReference('/apex/SendEmailFromLead?emailSent='+'Email Successfully Sent');
            } else {
                emailSent = 'Email Not Sent';
                pageRef = New PageReference('/apex/SendEmailFromLead?emailSent='+'Email Not Sent');
            }
            pageRef.setRedirect(true);
        } else {
            pageRef = null;
        }
       
        return pageRef ;
    }

}

Step 2: Create visualforce Page - PageName : SendEmailFromLead
<apex:page standardcontroller="lead" extensions="SendEmailFromLeadController" action="{!sendEmail}">
<apex:form >
 <b style="color:red">{!emailSent}</b>
</apex:form>
</apex:page>

Step 3: Create custom Button on lead object for example like this

Thats it...Go to Lead Record..Enter email,description,subject fields and then click 'Send Email' button to send an email .Enjoy...

Friday, September 22, 2017

What is Salesforce Ohana?

What is Salesforce Ohana?

Salesforce Ohana is simply an idea that keeps all the family members together ,helping each other,enjoying together etc.

Go through this link Salesforce Ohana to know more about it.

Do you know about Salesforce MVP?

Do you know about Salesforce MVP?

Go through the link Salesforce MVP to know more about Salesforce MVP.

Wednesday, September 20, 2017

Salesforce New MVP's

Congratulations to all the new Salesforce MVP's.
You really helped all the salesforce Admins/Developers through your blogs,communities etc.
Please go through the link for more information on Salesforce MVP
Salesforce MVP 

How to create or register namespace in salesforce instance

Step 1: Go to Setup --> Create --> packages.

Step 2: Click on 'Edit' button under Developer Settings section.The following screen appears.

Step 3: Once 'Continue' button is clicked,the following screen appears

Step 4: Enter Namespace prefix in 'Register a namespace prefix' section and check if its available.For example 'ksk' namespace prefix is available.Then click on 'Review My Selections' button as shown in the image below.

Step 5: After click on 'Review My Selections' button,you will be redirected to the following screen.

Step 6: Click on 'Save' button,it will be redirected to the screen as shown in the image below.

That's it, the namespace is successfully created.