Search This Blog

Thursday, August 25, 2016

get Sobject name from Sobject in apex - Salesforce Globe For You

Sample Code :
Sobject sObj = (Sobject) new Account();
String sObjName = sObj.getSObjectType().getDescribe().getName();
system.debug('sObjNamesObjName :'+sObjName );

Output :

Monday, August 22, 2016

Dynamically get datatype of a field in apex Salesforce.

Problem : I know sobject name and field api name as well.Now I want to know the datatype of this field dynamically in apex
Solution:
For example :
String sObjName ='contact';
String fieldName = 'Birthdate';
Schema.DisplayType fielddataType =  Schema.getGlobalDescribe().get(sObjName).getDescribe().fields.getMap().get(fieldName).getDescribe().getType();
system.debug('fielddataType fielddataType '+fielddataType );
if(fielddataType == Schema.DisplayType.Date) {
   System.debug('Birthdate Field DataType is : Date');
}
Output :

How to make first letter of a word Capital in apex Salesforce

Use "capitalize() " to make first letter of a word as Capital.
Sample Code :
Run the below piece of code in Apex execute of Workbench
String str ='hello';
str= str.capitalize();
system.debug('Output String : '+str);
Output :


Tuesday, August 9, 2016

How to restrict other picklist values getting saved in particular picklist field other than its predefined values in salesforce?

Solution : By selecting " Strictly enforce picklist values" checkbox, we can enable validation of picklist values against the list of defined values.
we define picklist values when we create the custom picklist field.
However, users can introduce extraneous/new values by loading values through the API.
In order to restrict adding new values to picklist through API's,We need to select "Strictly enforce picklist values" checkbox when creating/updating the custom picklist field as shown in the image below.

Note : Only a new custom picklist field can be a restricted picklist. we can't convert an existing non-restricted picklist to a restricted picklist.

How to use(include) lightning component in visualforce page(salesforce)

Steps :
Step 1: Develop the lightning component which you need to include/display in vf page.
Lightning Component :LightningComponentInVF.cmp
<aura:component >
    <ltng:require styles="{!$Resource.SLDS100 +
         '/assets/styles/salesforce-lightning-design-system-ltng.css'}"/>
    <div class="slds">
         <h1>Lets see how to include this component in visualforce Page</h1>
    </div>
</aura:component>
Note : Replace "SSLDS100" with the static resource which holds lightning files.
Step 2: Create a lightning app to hold this lightning component.
Lightning app : LightningComponentInVFPage.app
<aura:application access="GLOBAL" extends="ltng:outApp">
    <aura:dependency resource="ksk:LightningComponentInVF"/>
</aura:application>
Imp Note : In order to make this app available for vf page ,we need to give global access for this and also need to use "ltng:outApp" interface as shown in the above app code.
Step 3: Create a visualforce page and use this app in it.
Visualforce Page : LightningComponentInVfPage
<apex:page standardStylesheets="false" showHeader="false" sidebar="false">
<!-- include the lightning.out.js file -->
    <apex:includeScript value="/lightning/lightning.out.js" />
<!-- Provide a section/div for lightning component-->
    <div id="lightningComponentDiv" />
    <script>
        $Lightning.use("ksk:LightningComponentInVFPage", function() {
          $Lightning.createComponent("ksk:LightningComponentInVF",
          {},
          "lightningComponentDiv",
          function(cmp) {
          });
        });
    </script>
</apex:page>
Note : Replace "ksk:LightningComponentInVFPage" with your lightning app and also replace "ksk:LightningComponentInVF" with your lightning component in the above vf page code.
Output : Once you run the vf page,the output will be like this.

Monday, August 8, 2016

How to override standard required field validation messages in visualforce page Salesforce.

Steps :
Step 1: First we need to use required="false" for that field as shown in the below piece of code.
<apex:inputField value="{!acc.name}" required="false"/>
Step 2: To make that field required use the sample code below.
<apex:pageBlockSectionItem > Account Name
   <apex:outputPanel layout="block" style="float: left">
 <apex:outputPanel >
<div class="requiredInput"><div class="requiredBlock"/>
 <apex:inputField value="{!acc.name}" required="false" />          
</div>
 </apex:outputPanel>                              
   </apex:outputPanel>
</apex:pageBlockSectionItem>

Example :
Apex Class : StandardErrorOverrideController
public class StandardErrorOverrideController {
    public account acc {get;set;}
    public StandardErrorOverrideController() {
        acc = new Account();
    }
    public void saveData() {

        try {
        insert acc;
        } catch(DMLException e) {
            if(acc.name =='' || acc.name == null) {
                acc.name.addError('Account Name Cannot be Null');
            }
        }      
   }    
}
Visualforce Page :
<apex:page controller="StandardErrorOverrideController">
<apex:form >
    <apex:pageBlock title="My Content" mode="edit">
        <apex:pageBlockButtons >
            <apex:commandButton action="{!saveData}" value="Save"/>
        </apex:pageBlockButtons>
        <apex:pageBlockSection title="My Content Section" columns="2">
             <apex:pageBlockSectionItem > Account Name
               <apex:outputPanel layout="block" style="float: left">
                      <apex:outputPanel >
                            <div class="requiredInput"><div class="requiredBlock"/>
                                  <apex:inputField value="{!acc.name}" required="false" />          
                            </div>
                      </apex:outputPanel>                              
               </apex:outputPanel>
            </apex:pageBlockSectionItem>
            <apex:inputField value="{!acc.site}"/>
            <apex:inputField value="{!acc.type}"/>
        </apex:pageBlockSection>
    </apex:pageBlock>
</apex:form>
</apex:page>
Output :
With out entering value for account name,click save button.The custom error message will appear as shown in the image below.

Standard Error message will be as shown in the image below.

How to create new contact When ever account is created/updated and rating equals to "Hot" using process Builder.

Steps :
Step 1: Go to Setup --> Create --> Workflow & approvals --> process Builder --> Click on "New" button to create a new process as shown in the image below

Step 2: Enter process name,description etc as shown in the image below and click on "Save".

Step 3: Click on "Add Object" ,a screen will appear at the right side as shown in the images below.
Select the object as "Account" and select the checkbox "When a record is created or edited"  in the start the process section.
and then click on "Save" button.


Step 4: Click on "Add Criteria" as shown in the image below. and then enter criteria name.
In the Criteria for Executing Actions,select "Conditions are met".
In the Set Conditions ,we need to add one row to keep condition.
Select rating (Account Rating) in the Field lookup and in the value select "hot" as the value as shown in the image below and then click on "save"


Step 5: Click on "Add Action" in the immediate actions as shown in the image below.

A screen will be displayed at the right side.
Select action type as "Create a record".
Give any name for Action Name
Select contact as record type.
In the set Field Values section,We need to add 2 rows.
1)One is to map contact name with account name.
2)The other is to map the newly created contact with its parent account record.
Add the 2 rows as shown in the image below.

Note : Need to use reference in the type to map contact name with its account name.
Step 6: Click on "Activate" button to activate the flow as shown in the image below.

It will show a popup as shown in the image below.

Click on "Confirm" button to activate the flow.
That's it..Now when we create a new account record With rating as "hot" or update existing account record with "hot" as rating value,New contact will get created as shown in the image below.

force:recordView tag in Lightning Component

force:recordView tag is used to display a record in read-only view.
The record can be displayed in 2 different layouts.By default, the record view uses the full layout to display all fields of the record.
1) MINI -- The mini layout displays the name field and any associated parent record field.
2) FULL --displays all fields of the record.
Example :
AppToDisplayRecordView.app :
<aura:application >
    <ltng:require styles="{!$Resource.SLDS100 +
         '/assets/styles/salesforce-lightning-design-system-ltng.css'}"/>
    <div class="slds">
         <c:DisplayRecordView />
    </div>
</aura:application>

DisplayRecordView.cmp :
<aura:component >
<force:recordView recordId="00328000003Z3Ih" type="MINI"/>
</aura:component>
Note : "00328000003Z3Ih" is the contactId in my instance.Replace this with the contactId of the contact present in your instance.
Output:

Modify the above component to display in FULL layout.
<aura:component >
<force:recordView recordId="00328000003Z3Ih" type="FULL"/>
</aura:component>
Output:

Friday, August 5, 2016

wrapper class in lightning Component salesforce

Example:
Apex Class(wrapper) : GameDataWrapper
public class GameDataWrapper {
@AuraEnabled
public List<String> members;
@AuraEnabled
public String game;
public GameDataWrapper () {
members = new List<String>();
game ='';
}
}
Apex Class : SportsController
public class SportsController {
      @AuraEnabled
    public static List<GameDataWrapper> getSportDetails() {
        List<GameDataWrapper> gamesList = new List<GameDataWrapper>();
        GameDataWrapper singleGameDataWrapper = new GameDataWrapper();
        singleGameDataWrapper.members.add('Sachin');
        singleGameDataWrapper.members.add('Dhoni');
        singleGameDataWrapper.members.add('Kohli');
        singleGameDataWrapper.game = 'Cricket';
        gamesList.add(singleGameDataWrapper);
         GameDataWrapper singleGameDataWrapper1 = new GameDataWrapper();
        singleGameDataWrapper1.members.add('Sreejesh');
        singleGameDataWrapper1.members.add('sardara Singh');
        singleGameDataWrapper1.members.add('Danish');
        singleGameDataWrapper1.game = 'Hockey';
        gamesList.add(singleGameDataWrapper1);
        return gamesList;
    }
 
}
Sports.cmp :
<aura:component controller="ksk.SportsController" implements="forceCommunity:availableForAllPageTypes,force:appHostable,flexipage:availableForAllPageTypes,force:hasRecordId">
    <aura:handler name="init" action="{!c.myAction}" value="{!this}" />
   <aura:attribute name="gameTypes" type="ksk.GameDataWrapper[]"/>
   <div class="slds-form-element">
<ol >
             <li><b>Game:</b>
             <aura:iteration items="{!v.gameTypes}" var="type" indexVar="index">
                 <li>{!index+1}) {!type.game}</li>
                     <b>Players :</b>
                     <aura:iteration items="{!type.members}" var="member" indexVar="index1">
                         <li>{!index1+1}. {!member}</li>
                     </aura:iteration>
             </aura:iteration></li>
        </ol>
    </div>
</aura:component>
SportsController.js :
({
    myAction : function(component, event, helper) {
        var action = component.get("c.getSportDetails");
    action.setCallback(this, function(data) {
    component.set("v.gameTypes", data.getReturnValue());
        console.log(data.getReturnValue());
    });
    $A.enqueueAction(action);
    }
})

Sports.app :
<aura:application >
    <ltng:require styles="{!$Resource.SLDS100 +
         '/assets/styles/salesforce-lightning-design-system-ltng.css'}"/>
    <div class="slds">
         <c:Sports />
    </div>
</aura:application>

Output :


How to run Lightning Application?

Step 1: Go to developer console and open the app which you want to run.
Step 2: Click on "preview" which is present on top right side of that application as shown in the image below.

How to open Lightning Application/components?

Step 1: Go to Developer Console --> File --> "open Lightning Resources" as shown in the image below.

Step 2: Select the component to open and then click on "open Selected" button.
Your component get's opened.

How to display ordered list(with numbers) of items in lightning component?

We can use "indexVar" of <aura:iteration> tag to index the list of items.
Example: 
IterationExample.app :
<aura:application >
    <ltng:require styles="{!$Resource.SLDS100 +
         '/assets/styles/salesforce-lightning-design-system-ltng.css'}"/>
    <div class="slds">
         <c:ListDescription />
    </div>
</aura:application>
ListDescription.cmp :
<aura:component>
    <aura:attribute name="fruits" type="List"
        default="['Apple.',
            'Orange.',
            'Banana.']"/>
    <b><h2>List of Fruits :</h2></b>
    <ol>
    <aura:iteration items="{!v.fruits}" var="fruit" indexVar="index" >
        <li>{!index+1}) {!fruit}</li>
    </aura:iteration>
    </ol>  
</aura:component>
Output :

How to iterate over a list of items in Lightning Component

We can iterate over a list of items using <aura:iteration> tag.
Example :
IterationExample.app :
<aura:application >
    <ltng:require styles="{!$Resource.SLDS100 +
         '/assets/styles/salesforce-lightning-design-system-ltng.css'}"/>
    <div class="slds">
         <c:ListDescription />
    </div>
</aura:application>
ListDescription.cmp :
<aura:component>
    <aura:attribute name="fruits" type="List"
        default="['Apple.',
            'Orange.',
            'Banana.']"/>
    <b><h2>List of Fruits :</h2></b>
    <ol>
    <aura:iteration items="{!v.fruits}" var="fruit">
        <li>{!fruit}</li>
    </aura:iteration>
    </ol>  
</aura:component>
Output :

Thursday, August 4, 2016

How to delete a lightning Component

Steps: Deleting a lightning component is very easy.
Step 1: Open the lightning component in Developer console.
Example: I want to delete "helloMessage.cmp" component.So I opened it in developer console.
Go to File --> Open Lightning Resources -->Select component to open(helloMessage.cmp) --> Click on "Open Selected" button.

Step 2: Delete this component by pressing "Delete" button(Go to File --> Delete).
That's it..The component is deleted....
Note: If the component is referenced somewhere else in the system ,it won't get deleted.Remove the references and then delete it.

Displaying Data in multiple columns in lightning Component

We have seen how to display data in 2 column layout in the previous post.
see Display Data in 2 column Layout .
To display data in 3- column layout the structure will be like this
<div class="slds">
<div class="slds-grid slds-wrap">
<div class="slds-col--padded slds-size--1-of-1 slds-medium-size--1-of-3">
</div>
<div class="slds-col--padded slds-size--1-of-1 slds-medium-size--1-of-3">
</div>
<div class="slds-col--padded slds-size--1-of-1 slds-medium-size--1-of-3">
</div>
</div>
</div>
To display data in 4 - column layout the structure will be like this
<div class="slds">
<div class="slds-grid slds-wrap">
<div class="slds-col--padded slds-size--1-of-1 slds-medium-size--1-of-4">
</div>
<div class="slds-col--padded slds-size--1-of-1 slds-medium-size--1-of-4">
</div>
<div class="slds-col--padded slds-size--1-of-1 slds-medium-size--1-of-4">
</div>
<div class="slds-col--padded slds-size--1-of-1 slds-medium-size--1-of-4">
</div>
</div>
</div>
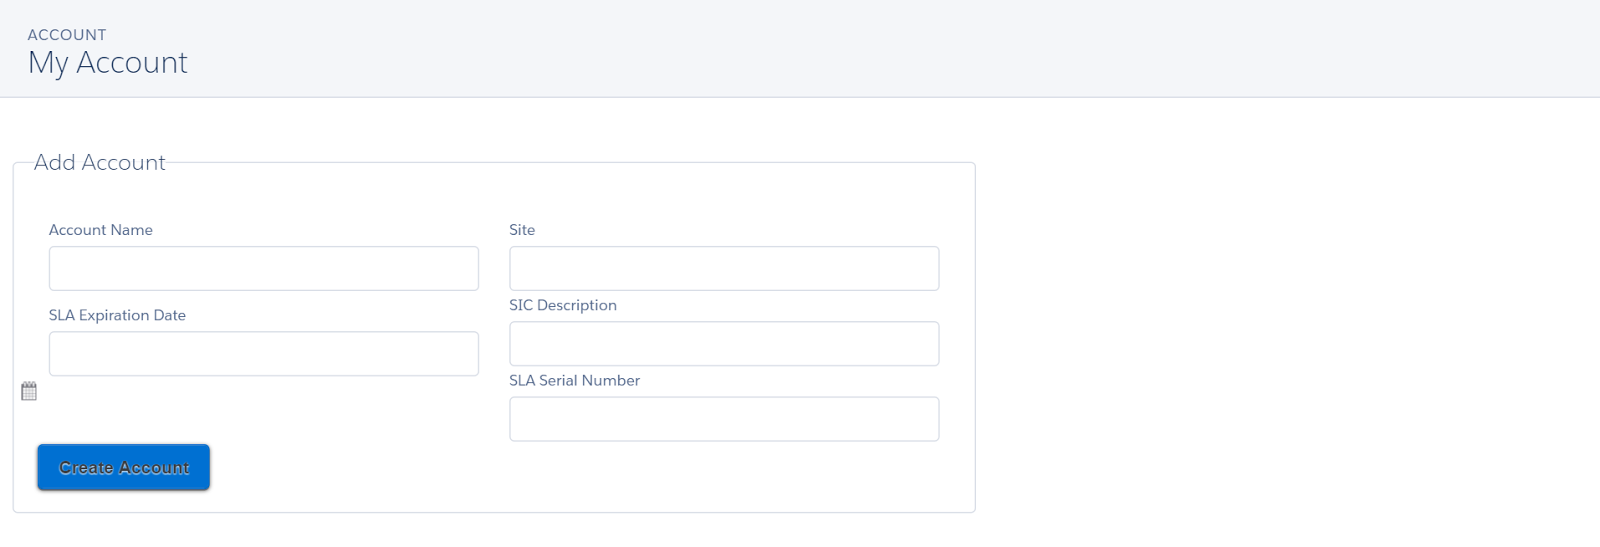
Example to display data in 3 -column layout :
Note:I was just modifying AccountCreation.cmp component of previous post.
Remaining components will be same.
AccountCreation.cmp
<aura:component implements="force:appHostable,forceCommunity:availableForAllPageTypes,flexipage:availableForAllPageTypes" controller="AccountController">
     <aura:attribute name="newAccount" type="Account"
                    default="{ 'sobjectType': 'Account'                            
                             }"/>
    <!-- PAGE HEADER -->
    <div class="slds-page-header" role="banner">
        <div class="slds-grid">
            <div class="slds-col">
                <p class="slds-text-heading--label">Account</p>
                <h1 class="slds-text-heading--medium">My Account</h1>
            </div>
        </div>
    </div>
    <!-- / PAGE HEADER -->
    <!-- NEW Account FORM -->
    <div class="slds-col slds-col--padded slds-p-top--large">
        <div aria-labelledby="Accountform">
            <!-- BOXED AREA -->
            <fieldset class="slds-box slds-theme--default slds-container--large">
                <legend id="Accountform" class="slds-text-heading--small
                                                       slds-p-vertical--medium">
                    Add Account
                </legend>
                <!-- CREATE NEW Account FORM -->
                <form class="slds-form--stacked">
                <div class="slds">
<div class="slds-grid slds-wrap">
<div class="slds-col--padded slds-size--1-of-1 slds-medium-size--1-of-3">

<div class="slds-form-element slds-is-required">
<div class="slds-form-element__control">
<ui:inputText aura:id="account Name" label="Account Name"
 class="slds-input"
 labelClass="slds-form-element__label"
 value="{!v.newAccount.Name}"
 />
</div>
                        </div>
                       
                        <div class="slds-form-element">
                          <div class="slds-form-element__control">
                              <ui:inputDate aura:id="accountSLADate" label="SLA Expiration Date"
                                  class="slds-input"
                                  labelClass="slds-form-element__label"
                                  value="{!v.newAccount.ksk__SLAExpirationDate__c}"
                                  displayDatePicker="true"/>
                          </div>
                      </div>


</div>
                    <div class="slds-col--padded slds-size--1-of-1 slds-medium-size--1-of-3">

<div class="slds-form-element slds-is-required">
<div class="slds-form-element__control">
<ui:inputText aura:id="account Name" label="Account Name"
 class="slds-input"
 labelClass="slds-form-element__label"
 value="{!v.newAccount.Name}"
 />
</div>
                        </div>
                       
                        <div class="slds-form-element">
                          <div class="slds-form-element__control">
                              <ui:inputDate aura:id="accountSLADate" label="SLA Expiration Date"
                                  class="slds-input"
                                  labelClass="slds-form-element__label"
                                  value="{!v.newAccount.ksk__SLAExpirationDate__c}"
                                  displayDatePicker="true"/>
                          </div>
                      </div>


</div>
<div class="slds-col--padded slds-size--1-of-1 slds-medium-size--1-of-3">
<div class="slds-form-element__control">
<ui:inputText aura:id="expname" label="Site"
 class="slds-input"
 labelClass="slds-form-element__label"
 value="{!v.newAccount.ksk__Site}"
 />
</div>
<div class="slds-form-element__control">
<ui:inputText aura:id="expname" label="SIC Description"
 class="slds-input"
 labelClass="slds-form-element__label"
 value="{!v.newAccount.ksk__SicDesc}"
 />
</div>

<div class="slds-form-element__control">
<ui:inputText aura:id="accountSerialNumber" label="SLA Serial Number"
 class="slds-input"
 labelClass="slds-form-element__label"
 value="{!v.newAccount.ksk__SLASerialNumber__c}"
 />
</div>
</div>
</div>
</div>  
<div class="slds-form-element">
<ui:button label="Create Account"
  class="slds-button slds-button--brand"
  press="{!c.clickCreateAccount}"/>
</div>
            </form>
            <!-- / CREATE NEW Account FORM -->
            </fieldset>
            <!-- / BOXED AREA -->
        </div>
        <!-- / CREATE NEW Account -->
    </div>
    <!-- / NEW Account FORM -->
   
</aura:component>

Output:


How to change (or increase) the layout size (screen size) of lightning Component in Salesforce

We can increase/decrease the layout size by modifying the class attribute of fieldset tag.
To display in small size :
<fieldset class="slds-box slds-theme--default slds-container--small">
To display in medium Size: 
<fieldset class="slds-box slds-theme--default slds-container--medium">
To display in Large Size: 
<fieldset class="slds-box slds-theme--default slds-container--Large">

Example: The following example shows how to display medium size screen(layout) in lightning component.
Apex Class : AccountController 
public class AccountController {
    @AuraEnabled
    public static Account saveAccount(Account accountObj) {
        insert accountObj;
        system.debug('AccountAccount'+accountObj);
        return accountObj;
    }
}
Lightning Application : AccountApp.app
<aura:application >
    <ltng:require styles="{!$Resource.SLDS100 +
         '/assets/styles/salesforce-lightning-design-system-ltng.css'}"/>
    <div class="slds">
         <c:AccountCreation />
    </div>
</aura:application>
Note:
1)We used medium in the style class of fieldset tag in the component below.
2)Replace static resource url with the url of lightning resources zip file which you download.
Lightning Component :AccountCreation.cmp
<aura:component implements="force:appHostable,forceCommunity:availableForAllPageTypes,flexipage:availableForAllPageTypes" controller="AccountController">
     <aura:attribute name="newAccount" type="Account"
                    default="{ 'sobjectType': 'Account'                            
                             }"/>
    <!-- PAGE HEADER -->
    <div class="slds-page-header" role="banner">
        <div class="slds-grid">
            <div class="slds-col">
                <p class="slds-text-heading--label">Account</p>
                <h1 class="slds-text-heading--medium">My Account</h1>
            </div>
        </div>
    </div>
    <!-- / PAGE HEADER -->
    <!-- NEW Account FORM -->
    <div class="slds-col slds-col--padded slds-p-top--large">
        <div aria-labelledby="Accountform">
            <!-- BOXED AREA -->
            <fieldset class="slds-box slds-theme--default slds-container--medium">
                <legend id="Accountform" class="slds-text-heading--small
                                                       slds-p-vertical--medium">
                    Add Account
                </legend>
                <!-- CREATE NEW Account FORM -->
                <form class="slds-form--stacked">
                <div class="slds">
<div class="slds-grid slds-wrap">
<div class="slds-col--padded slds-size--1-of-1 slds-medium-size--1-of-2">

<div class="slds-form-element slds-is-required">
<div class="slds-form-element__control">
<ui:inputText aura:id="account Name" label="Account Name"
 class="slds-input"
 labelClass="slds-form-element__label"
 value="{!v.newAccount.Name}"
 />
</div>
                        </div>
                       
                        <div class="slds-form-element">
                          <div class="slds-form-element__control">
                              <ui:inputDate aura:id="accountSLADate" label="SLA Expiration Date"
                                  class="slds-input"
                                  labelClass="slds-form-element__label"
                                  value="{!v.newAccount.ksk__SLAExpirationDate__c}"
                                  displayDatePicker="true"/>
                          </div>
                      </div>


</div>
<div class="slds-col--padded slds-size--1-of-1 slds-medium-size--1-of-2">
<div class="slds-form-element__control">
<ui:inputText aura:id="expname" label="Site"
 class="slds-input"
 labelClass="slds-form-element__label"
 value="{!v.newAccount.ksk__Site}"
 />
</div>
<div class="slds-form-element__control">
<ui:inputText aura:id="expname" label="SIC Description"
 class="slds-input"
 labelClass="slds-form-element__label"
 value="{!v.newAccount.ksk__SicDesc}"
 />
</div>

<div class="slds-form-element__control">
<ui:inputText aura:id="accountSerialNumber" label="SLA Serial Number"
 class="slds-input"
 labelClass="slds-form-element__label"
 value="{!v.newAccount.ksk__SLASerialNumber__c}"
 />
</div>
</div>
</div>
</div>  
<div class="slds-form-element">
<ui:button label="Create Account"
  class="slds-button slds-button--brand"
  press="{!c.clickCreateAccount}"/>
</div>
            </form>
            <!-- / CREATE NEW Account FORM -->
            </fieldset>
            <!-- / BOXED AREA -->
        </div>
        <!-- / CREATE NEW Account -->
    </div>
    <!-- / NEW Account FORM -->
   
</aura:component>
Controller : AccountCreationController.js
({
    clickCreateAccount: function(component, event, helper) {
        var newAccount = component.get("v.newAccount");
        helper.createAccount(component, newAccount);
}
})

Helper : AccountCreationHelper.js
({
    createAccount: function(component, Account) {
    var action = component.get("c.saveAccount");
    action.setParams({
        "accountObj": Account
    });
    action.setCallback(this, function(response){
        var state = response.getState();
        if (component.isValid() && state === "SUCCESS") {
            var newAccount = component.get("v.newAccount");
            component.set("v.newAccount", newAccount);
        }
    });
    $A.enqueueAction(action);
}
})
Output:
Sample Outputs:
small :

Medium:

Large :

How to display a form of data in 2 columns(2-column layout) using lightning component of Salesforce

Apex Class : AccountController

public class AccountController {
    @AuraEnabled
    public static Account saveAccount(Account accountObj) {
        insert accountObj;
        system.debug('AccountAccount'+accountObj);
        return accountObj;
    }
}
Lightning Application : AccountApp.app

<aura:application >
    <ltng:require styles="{!$Resource.SLDS100 +
         '/assets/styles/salesforce-lightning-design-system-ltng.css'}"/>
    <div class="slds">
         <c:AccountCreation />
    </div>
</aura:application>
Note:Replace static resource url with the url of lightning resources zip file which you download.
Lightning Component :AccountCreation.cmp
<aura:component implements="force:appHostable,forceCommunity:availableForAllPageTypes,flexipage:availableForAllPageTypes" controller="AccountController">
     <aura:attribute name="newAccount" type="Account"
                    default="{ 'sobjectType': 'Account'                            
                             }"/>
    <!-- PAGE HEADER -->
    <div class="slds-page-header" role="banner">
        <div class="slds-grid">
            <div class="slds-col">
                <p class="slds-text-heading--label">Account</p>
                <h1 class="slds-text-heading--medium">My Account</h1>
            </div>
        </div>
    </div>
    <!-- / PAGE HEADER -->
    <!-- NEW Account FORM -->
    <div class="slds-col slds-col--padded slds-p-top--large">
        <div aria-labelledby="Accountform">
            <!-- BOXED AREA -->
            <fieldset class="slds-box slds-theme--default slds-container--small">
                <legend id="Accountform" class="slds-text-heading--small
                                                       slds-p-vertical--medium">
                    Add Account
                </legend>
                <!-- CREATE NEW Account FORM -->
                <form class="slds-form--stacked">
                <div class="slds">
<div class="slds-grid slds-wrap">
<div class="slds-col--padded slds-size--1-of-1 slds-medium-size--1-of-2">

<div class="slds-form-element slds-is-required">
<div class="slds-form-element__control">
<ui:inputText aura:id="account Name" label="Account Name"
 class="slds-input"
 labelClass="slds-form-element__label"
 value="{!v.newAccount.Name}"
 />
</div>
                        </div>
                       
                        <div class="slds-form-element">
                          <div class="slds-form-element__control">
                              <ui:inputDate aura:id="accountSLADate" label="SLA Expiration Date"
                                  class="slds-input"
                                  labelClass="slds-form-element__label"
                                  value="{!v.newAccount.ksk__SLAExpirationDate__c}"
                                  displayDatePicker="true"/>
                          </div>
                      </div>


</div>
<div class="slds-col--padded slds-size--1-of-1 slds-medium-size--1-of-2">
<div class="slds-form-element__control">
<ui:inputText aura:id="expname" label="Site"
 class="slds-input"
 labelClass="slds-form-element__label"
 value="{!v.newAccount.ksk__Site}"
 />
</div>
<div class="slds-form-element__control">
<ui:inputText aura:id="expname" label="SIC Description"
 class="slds-input"
 labelClass="slds-form-element__label"
 value="{!v.newAccount.ksk__SicDesc}"
 />
</div>

<div class="slds-form-element__control">
<ui:inputText aura:id="accountSerialNumber" label="SLA Serial Number"
 class="slds-input"
 labelClass="slds-form-element__label"
 value="{!v.newAccount.ksk__SLASerialNumber__c}"
 />
</div>
</div>
</div>
</div>  
<div class="slds-form-element">
<ui:button label="Create Account"
  class="slds-button slds-button--brand"
  press="{!c.clickCreateAccount}"/>
</div>
            </form>
            <!-- / CREATE NEW Account FORM -->
            </fieldset>
            <!-- / BOXED AREA -->
        </div>
        <!-- / CREATE NEW Account -->
    </div>
    <!-- / NEW Account FORM -->
   
</aura:component>
Controller : AccountCreationController.js

({
    clickCreateAccount: function(component, event, helper) {
        var newAccount = component.get("v.newAccount");
        helper.createAccount(component, newAccount);
}
})

Helper : AccountCreationHelper.js
({
    createAccount: function(component, Account) {
    var action = component.get("c.saveAccount");
    action.setParams({
        "accountObj": Account
    });
    action.setCallback(this, function(response){
        var state = response.getState();
        if (component.isValid() && state === "SUCCESS") {
            var newAccount = component.get("v.newAccount");
            component.set("v.newAccount", newAccount);
        }
    });
    $A.enqueueAction(action);
}
})

Output :One we run the app,following form will be displayed.
Fill the form and then click "Create Account" button. Account will be created as shown in the image below.