Apex class:
public with sharing class TreeStructure {
public List <Account> accountList{get; set;}
public List <contact> contactList{get; set;}
public List <case> caseList{get; set;}
public List <CaseComment> caseCommentList{get; set;}
List <Id> accountIds =new List<Id>();
List <Id> contactIds =new List<Id>();
List <Id> caseIds =new List<Id>();
public TreeStructure() {
accountList = [Select id, name,parentid from account limit 200];
for(account a:accountList ) {
accountIds.add(a.id);
}
contactList = [Select id, name,accountid from contact where accountid in:accountIds ];
for(contact a:contactList ) {
contactIds.add(a.id);
}
caseList = [Select id,casenumber,contactid from case where contactid in:contactIds ];
for(case a:caseList ) {
caseIds.add(a.id);
}
caseCommentList = [Select id,CommentBody,parentid from CaseComment where parentid in:caseIds ];
}
}
Static Resource: create a static resource with name "Jtreeview" and upload the file downloaded from this link
JTree Static Resource.
Visualforce Page :
<apex:page sidebar="false" controller="TreeStructure" showheader="false">
<!-- Include the Jquery Script files -->
<link rel="stylesheet" href="{!URLFOR($Resource.Jtreeview,'Jquerytreeview/jquery.treeview.css')}"/>
<script src="{!URLFOR($Resource.Jtreeview,'Jquerytreeview/jquery.js')}" type="text/javascript"></script>
<script src="{!URLFOR($Resource.Jtreeview,'Jquerytreeview/jquery.cookie.js')}" type="text/javascript"></script>
<script src="{!URLFOR($Resource.Jtreeview,'Jquerytreeview/jquery.treeview.js')}" type="text/javascript"></script>
<!-- End of Javascript files -->
<script type="text/javascript">
$(function() {
$("#tree").treeview({
collapsed: false,
animated: "medium",
control:"#sidetreecontrol",
persist: "location"
});
})
</script>
<br/> <br/> <br/>
<!-- Tree -->
<div class="treeheader" style="height:0px;"> </div>
<div id="sidetreecontrol"><a href="?#"><font style="color:blue;">Collapse All</font></a> | <a href="?#"><font style="color:blue;">Expand All</font></a></div>
<ul id="tree">
<apex:repeat value="{!accountList}" var="acc">
<li class="closed"><span class="folder">{!acc.name}</span>
<ul>
<apex:repeat value="{!contactList}" var="c">
<apex:outputtext rendered="{!c.accountid==acc.id}"><li><span class="file"><a href="/{!c.id}" target="_blank">{!c.name}</a></span>
<ul>
<apex:repeat value="{!caseList}" var="c1">
<apex:outputtext rendered="{!c1.contactid==c.id}"><li><span class="file"><a href="/{!c1.id}" target="_blank">{!c1.casenumber}</a></span>
<ul>
<apex:repeat value="{!caseCommentList}" var="c2">
<apex:outputtext rendered="{!c2.parentid==c1.id}"> <li><span class="file"><a href="/{!c.id}" target="_blank">{!c2.CommentBody}</a></span>
</li></apex:outputtext>
</apex:repeat>
</ul>
</li></apex:outputtext>
</apex:repeat>
</ul>
</li></apex:outputtext>
</apex:repeat>
<apex:repeat value="{!accountList}" var="acc1" first="1">
<apex:outputtext rendered="{!acc1.parentid==acc.id}"><li class="closed"><span class="folder">{!acc1.name}</span>
<ul>
<apex:repeat value="{!contactList}" var="c">
<apex:outputtext rendered="{!c.accountid==acc1.id}"><li><span class="file"><a href="/{!c.id}" target="_blank">{!c.name}</a></span>
<ul>
<apex:repeat value="{!caseList}" var="c1">
<apex:outputtext rendered="{!c1.contactid==c.id}"><li><span class="file"><a href="/{!c1.id}" target="_blank">{!c1.casenumber}</a></span>
<ul>
<apex:repeat value="{!caseCommentList}" var="c2">
<apex:outputtext rendered="{!c2.parentid==c1.id}"> <li><span class="file"><a href="/{!c.id}" target="_blank">{!c2.CommentBody}</a></span>
</li></apex:outputtext>
</apex:repeat>
</ul>
</li></apex:outputtext>
</apex:repeat>
</ul>
</li></apex:outputtext>
</apex:repeat>
</ul>
</li>
</apex:outputtext></apex:repeat>
</ul>
</li>
</apex:repeat>
</ul>
<!-- End of Tree -->
</apex:page>
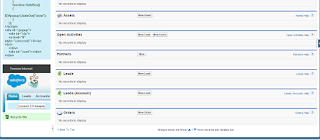
Output: